
Well, for my first post, I figured I'd post what I ate for dinner tonight! It's one of my go-to snacks and meals. Making the vietnamese spring rolls are easy, healthy, and definitely delicious!
I first learned how to make this from my ex-girlfriend, who taught me several vietnamese dishes, this always being one of my favorites! However, I tend to make it in a little less of a traditional fashion than she did and probably many vietnamese people do. In any case, I enjoy making often and in many different varieties! I vary the rolls by what the ingredients are that include in the wrappers. Here are the ingredients that I used today (ones at the top of the list r the necessary, then the typical, and then ones that I personally like):
Ingredients
1 pkg spring roll wrappers (easily purchased at most general grocery stores)
1 pkg rice vermacelli
vietnamese mint (also called chinese basil as well other names)
Chicken/Pork/Shrimp/Beef
Bean Sprouts
Romaine Lettuce
Green onion (scallion)
Tomato (very thinly sliced)
Green/red/yellow pepper
jalepeño thinly sliced
Procedure
The most important thing in your prep is to have everything ready at the same time. This way the freshness of your ingredients is ensured. With that said, the first thing you should do is put two pots of water up to boil. In the first, add a healthy serving of salt. This will be the pot in which you boil your chicken, shrimp, and/or pork. If you choose to use beef, I recommend a little grill action making sure to to not grill past medium-rare. Anyways, in the second pot, add a good amount of oil (whatever kind you prefer). This pot will be the one in which you will boil the vermicelli.
During the time that it takes the water to boil and the protein and noodles to boil, you will be preparing all of the vegetables. Slice everything into strips and if not possible, simply thin enough to work well when wrapping. Use your own judgement. Place everything into piles on a cutting board or however you choose to lay it out.
When the chicken is fully cooked, extract it from the pot and slice this into strips as well. When the vermicelli noodles are fully cooked, drain it into a colander and rise the noodles with cold water. Place both of these on your cutting board or whatever you've chosen. Below is a picture of how I have my counter set up in order to make the rolls. On my cutting board, I have everything

In the background you can see that I have a plate. It has water filled to the top of it. This is in order to dip the rice wrapping papers to make them pliable. After soaking for about 30-60 seconds, it should be workable. Lay the wrapper out flat and the first ingredient to put down is the vermicelli. This helps the rolls have a better subtenant texture when you bite into it. After this layer, put in whatever and however much you want. Be sure to not stuff it so much that you cannot close the wrapper!

After placing all of the ingredients into the wrapper that you have chosen, lift the bottom of the wrapper and place it over and beyond all of the ingredients. Tighten your fold and roll it away from you one half turn so that the tip of the rice paper that you previously folded up is now tucked underneath. Fold botht he left and right side in.

At this point, all you have to do is roll it up, and you are finished!
You might also be interested in the dipping sauce. There are two traditional kinds. One is a peanut sauce and the other is a fish sauce mixed with several spices. I made the peanut sauce tonight. It's quite simple. Below is a picture of the sauce as well as all of the ingredients.
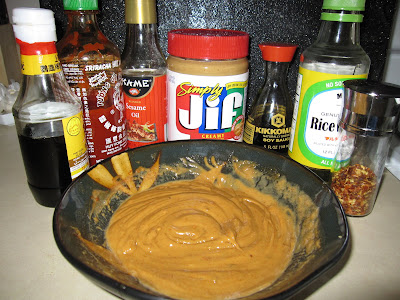
The two main ingredients are peanut butter (crunchy or smooth) and soy sauce. After that, everything else is to your taste. I used rice vinegar, shrachi sauce, fish sauce, sesame oil, red pepper flakes, and red chili powder. Stir and enjoy!!


